Back to Contents Page

Working Inside Your Computer: Dell Precision™ WorkStation 420 Systems User's Guide

bullet.gif (1107 bytes) Overview bullet.gif (1107 bytes) Replacing the Computer Cover (Mini Tower Chassis)
bullet.gif (1107 bytes) Before You Begin bullet.gif (1107 bytes) Removing and Replacing the AGP Card Brace (Mini Tower Chassis Only)
bullet.gif (1107 bytes) Removing the Computer Cover (Desktop Chassis) bullet.gif (1107 bytes) Inside Your Computer
bullet.gif (1107 bytes) Replacing the Computer Cover (Desktop Chassis) bullet.gif (1107 bytes) Rotating the Power Supply Away From the System Board (Desktop Chassis)
bullet.gif (1107 bytes) Removing the Computer Cover (Mini Tower Chassis) bullet.gif (1107 bytes) Rotating the Power Supply Away From the System Board (Mini Tower Chassis)
bullet.gif (1107 bytes) Removing and Replacing the Front Bezel (Mini Tower Chassis Only)

Overview

Your Dell Precision WorkStation 420 system supports a variety of internal options that expand system capabilities. This section prepares you to install options inside the computer. It describes how to remove and replace the computer cover and rotate the power supply away from the system board. It also familiarizes you with the internal components that you may handle if you install Dell™ hardware options.


Before You Begin

To make working inside your computer easier, make sure that you have adequate lighting and a clean work space. If you temporarily disconnect cables or remove expansion cards, note the position of the connectors and slots so that you can reassemble the system correctly.

You will use the information in this section every time you install a hardware option inside your computer. Read this section carefully, because the information is not repeated in detail elsewhere in this guide.

Safety First—For You and Your Computer

Working inside your computer is safe if you observe the following precautions.

caution.gif (709 bytes) CAUTION FOR YOUR PERSONAL SAFETY AND PROTECTION OF YOUR EQUIPMENT

Before starting to work on your computer, perform the following steps in the sequence indicated:

  1. Turn off your computer and all peripherals.

  2. Disconnect your computer and peripherals from their electrical outlets. Also, disconnect any telephone or telecommunication lines from the computer. Doing so reduces the potential for personal injury or shock.

  3. If you are disconnecting a peripheral from the computer or are removing a component from the system board, wait 10 to 20 seconds after disconnecting the computer from the electrical outlet before disconnecting the peripheral or removing the component to avoid possible damage to the system board.

  4. To verify that all power has been removed from the system, make sure that the standby power light-emitting diode (LED) on the system board has gone out. For the location of this LED, see Figure 1 in "Installing System Board Options."

  5. Touch an unpainted metal surface on the computer chassis, such as the power supply, before touching anything inside your computer.

  6. While you work, periodically touch an unpainted metal surface on the computer chassis to dissipate any static electricity that might harm internal components. Also avoid touching components or contacts on a card and avoid touching pins on a chip.

In addition, Dell recommends that you periodically review the safety instructions in your System Information Guide.

Unpacking Your Hardware Option

When you remove an option from its shipping carton, you may find it wrapped in antistatic packing material designed to protect it from electrostatic damage. Do not remove the packing material until you are ready to install the option.

NOTICE: See "Protecting Against Electrostatic Discharge" in your System Information Guide.


Removing the Computer Cover (Desktop Chassis)

  1. Turn off your computer and peripherals, and make sure that you unplug the computer from its electrical outlet before you remove the computer cover. Observe the Caution for Your Personal Safety and Protection of Your Equipment. Also observe the safety instructions found in your System Information Guide.

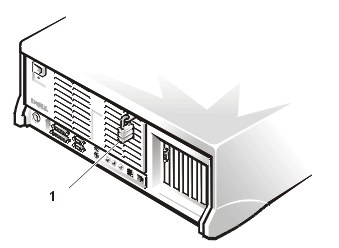
  2. If you have installed a padlock through the padlock ring on the back panel (see Figure 1), remove the padlock.

Figure 1. Padlock Installed (Desktop Chassis)
inside01.gif (16250 bytes)
1 Padlock ring
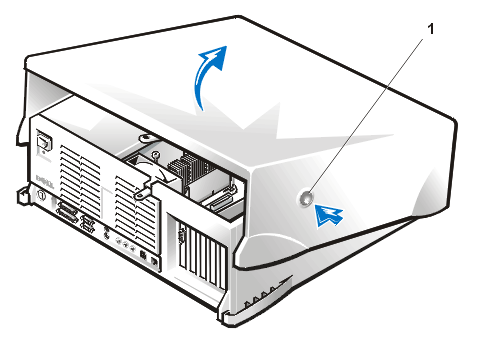
  1. Locate the release buttons on the sides of the cover (see Figure 2).

  2. From the front of the computer, press and hold the release buttons, and pivot the cover up toward you (see Figure 2).

  3. Disengage the cover hooks that secure the cover to the front of the chassis, and lift the cover away.

Figure 2. Removing the Computer Cover (Desktop Chassis)
inside02.gif (32091 bytes)
1 Release button (two, one each side)

Replacing the Computer Cover (Desktop Chassis)
  1. Check all cable connections, especially those that might have come loose during your work. Fold cables out of the way so that they do not catch on the computer cover. Make sure cables are not routed over the drive cage—they will prevent the cover from closing properly.

  2. Check to see that no tools or extra parts (including screws) are left inside the computer's chassis.

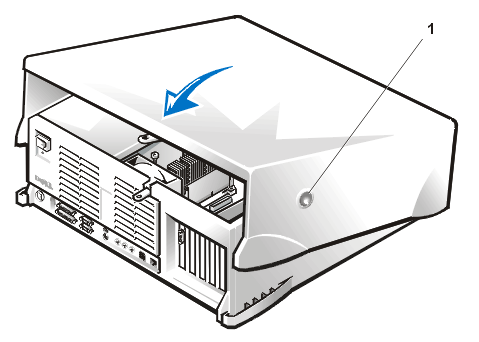
  3. Facing the front of the computer, hold the cover at a slight angle as shown in Figure 3.

  4. Fit the three cover hooks into the rectangular slots on the chassis. (It might be helpful to look down into the chassis to verify that the hooks are in place.)

  5. Pivot the cover down toward the back of the computer and into position.

  6. Make sure that the two release buttons click into place.

    NOTE: The computer should be placed fully on a flat surface. It is difficult to align the cover if the front of the computer is hanging over the edge of a table.

Figure 3. Replacing the Computer Cover (Desktop Chassis)

inside03.gif (31762 bytes)
1 Release button (two, one each side)
  1. If you are using a padlock to secure your system, reinstall the padlock.

  2. NOTE: After you remove and replace the cover, the chassis intrusion detector causes the following message to be displayed at the next system start-up:

    ALERT! Cover was previously removed.


  3. Reset the chassis intrusion detector by entering the System Setup program and setting Chassis Intrusion to Enabled or Enabled-Silent.

  4. NOTE: If a setup password has been assigned by someone else, contact your network administrator for information on resetting the chassis intrusion detector.

Removing the Computer Cover (Mini Tower Chassis)
  1. Turn off your computer and peripherals, and make sure that you unplug the computer from its electrical outlet before you remove the computer cover. Observe the Caution for Your Personal Safety and Protection of Your Equipment. Also observe the safety instructions found in your System Information Guide.

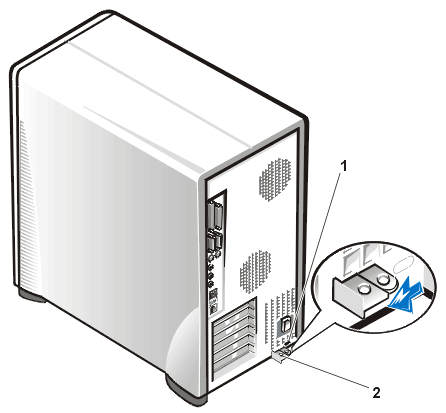
  2. If you have installed a padlock through the padlock ring on the back panel (see Figure 4), remove the padlock and slide the padlock ring to the open position.

Figure 4. Padlock Ring and Cable Slot

inside04.gif (30422 bytes)
1 Security cable slot
2 Padlock ring
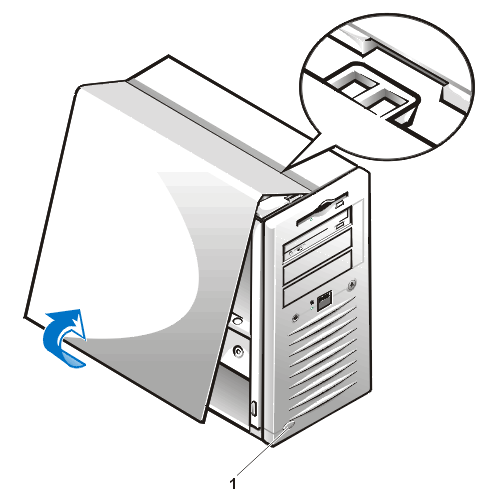
  1. Facing the left side cover, press the release button (located at the bottom-left corner of the front bezel) and lift the bottom of the cover, allowing it to pivot up toward you (see Figure 5).

  2. Disengage the hooks that secure the cover to the top of the chassis, and lift the cover away.

Figure 5. Removing the Computer Cover (Mini Tower Chassis)

inside05.gif (27291 bytes)
1 Release button

Removing and Replacing the Front Bezel (Mini Tower Chassis Only)

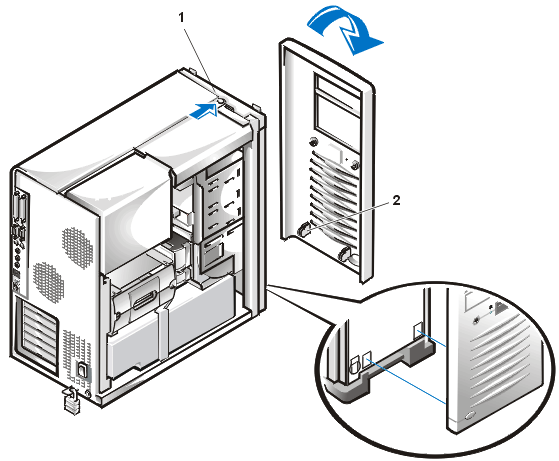
To access some drive bays in the mini tower chassis, you must first remove the front bezel. To remove the front bezel, you first must remove the computer cover (see " Removing the Computer Cover (Mini Tower Chassis)"). With the cover removed, release the bezel by pressing the tab release marked with the icon (see Figure 6).

Figure 6. Removing the Front Bezel
drives03.gif (59526 bytes)
1 Tab release
2 Retaining hooks (2)

While pressing the tab release, tilt the bezel away from the chassis, disengage the two retaining hooks at the bottom of the bezel, and carefully pull the bezel away from the chassis.

To replace the bezel, fit the two retaining hooks on the bezel into their corresponding slots at the bottom of the chassis (see Figure 6). Then rotate the top of the bezel toward the chassis until the top tabs snap into their corresponding slots on the bezel.


Replacing the Computer Cover (Mini Tower Chassis)
To replace the computer cover, perform the following steps:

  1. Check all cable connections, especially those that might have come loose during your work. Fold cables out of the way so that they do not catch on the computer cover. Make sure cables are not routed over the drive cage—they will prevent the cover from closing properly.

  2. Check to see that no tools or extra parts (including screws) are left inside the computer's chassis.

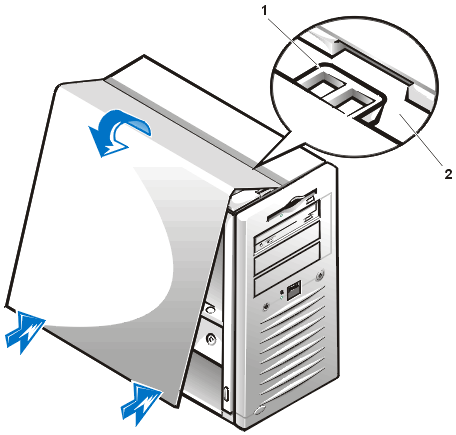
  3. Facing the left side of the computer, hold the cover at a slight angle as shown in Figure 7, and then align the top of the cover with the top of the chassis.

  4. Insert the three hooks on the cover into the three recessed slots on the computer chassis so that the tabs catch the hooks inside the slots.

  5. Pivot the cover down toward the bottom of the chassis and into position. Make sure the securing hooks at the bottom of the cover click into place.

Figure 7. Replacing the Computer Cover (Mini Tower Chassis)

inside06.gif (34126 bytes)
1 Hook
2 Recessed slot
  1. If you are using a padlock to secure your system, reinstall the padlock.

    NOTE: After removing and replacing the chassis, the chassis intrusion detector causes the following message to be displayed at the next system start-up:
    ALERT! Cover was previously removed.

  2. Reset the chassis intrusion detector by entering the System Setup program and setting Chassis Intrusion to Enabled or Enabled-Silent.

    NOTE: If a setup password has been assigned by someone else, contact your network administrator for information on resetting the chassis intrusion detector.

Removing and Replacing the AGP Card Brace (Mini Tower Chassis Only)

To access any expansion cards in the mini tower chassis, you must first remove the accelerated graphics port (AGP) card brace that secures an AGP card in the AGP socket.

caution.gif (709 bytes) CAUTION: Before you remove the computer cover, see "Safety First—For You and Your Computer."
  1. Remove the computer cover as instructed in "Removing the Computer Cover (Mini Tower Chassis)."

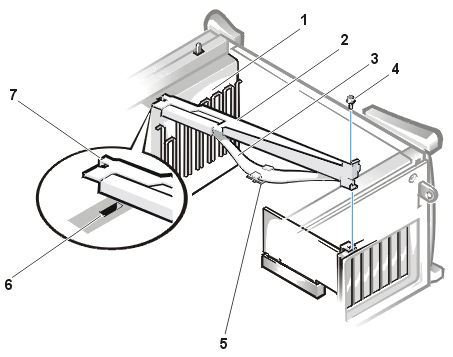
  2. Remove the screw securing the AGP card brace to the chassis (see Figure 8).

Figure 8. Removing the AGP Card Brace

brace01.gif (30702 bytes)
1 Card guide (front of chassis)
2 AGP card brace
3 Card brace spring
4 Screw
5 Plastic card guide
6 Slot
7 Tab
  1. Slide the brace toward the front of the system until it disengages from the slot in the card guide; then rotate the brace up and lift it away from the chassis.

To replace the brace, perform the following steps:

  1. Insert the tab on the end of the brace into the slot in the card guide at the front of the chassis (see Figure 8).

  2. Lower the brace, ensuring that the plastic card guide on the bottom of the brace spring engages the AGP card.

  3. Slide the brace toward the back of the system until the tab at the end engages the slot in the back wall.

  4. Replace the screw that secures the brace to the chassis.

Inside Your Computer

Figure 9 shows a top view of a desktop chassis computer to help you orient yourself when installing hardware options. Unless otherwise specified, locations or directions relative to the computer are as shown.

Figure 9. Computer Orientation View (Desktop Chassis)
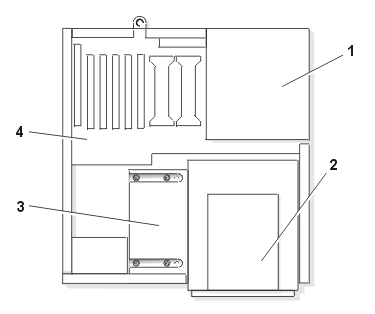
inside07.gif (9946 bytes)
1 Power supply
2 Externally accessible drive bays
3 Hard-disk drive bracket
4 System board

Figure 10 shows a top view of a mini tower chassis computer to help you orient yourself when installing hardware options. Unless otherwise specified, locations or directions relative to the computer are as shown.

Figure 10. Computer Orientation View (Mini Tower Chassis)
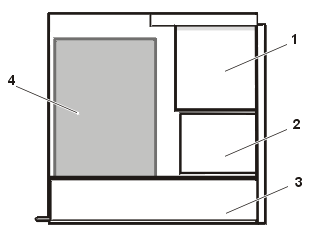
inside08.gif (6412 bytes)
1 Externally accessible drive bays
2 Hard-disk drive bracket
3 Power supply
4 System board

Figure 11 shows a desktop chassis computer with its cover removed. Refer to this illustration to locate interior features and components of the desktop chassis discussed in this guide.

Figure 11. Inside the Chassis (Desktop Chassis)
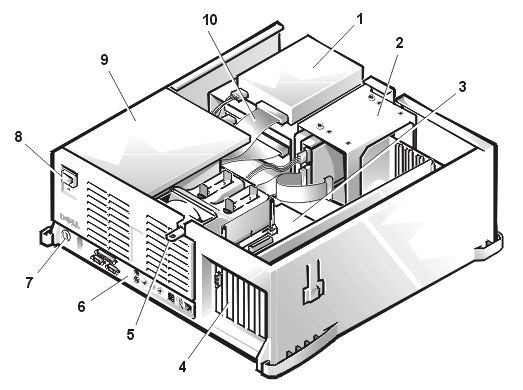
inside09.gif (49256 bytes)
1 Externally accessible drive bays
2 Hard-disk drive cage
3 System board
4 Expansion-card slots
5 Padlock ring
6 I/O panel connectors
7 Security cable slot
8 AC power receptacle
9 Power supply
10 Drive interface cable

Figure 12 shows a mini tower chassis computer with its cover removed. Refer to this illustration to locate interior features and components of the mini tower chassis discussed in this guide.

Figure 12. Inside the Chassis (Mini Tower Chassis)
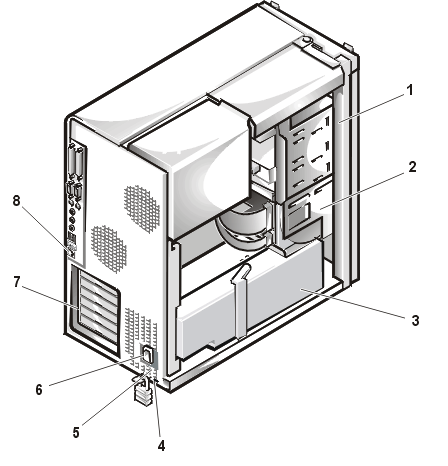
inside10.gif (41284 bytes)
1 Externally accessible drive bays
2 Hard-disk drive cage
3 Power Supply
4 Security cable slot
5 Padlock ring
6 AC power receptacle
7 Expansion-card slots
8 I/O panel connectors

Rotating the Power Supply Away From the System Board (Desktop Chassis)

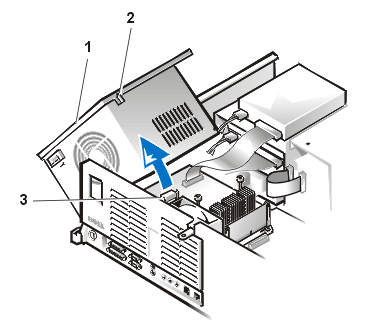
To access some components on the system board, you may have to rotate the system power supply out of the way. To rotate the power supply, perform the following steps.

caution.gif (709 bytes) CAUTION: Before you remove the computer cover, see "Safety First—For You and Your Computer."
  1. Remove the computer cover as instructed in "Removing the Computer Cover (Desktop Chassis)."

  2. Disconnect the AC power cable from the AC power receptacle on the back of the power supply (see Figure 12).

  3. Free the power supply by pressing the latch labeled "RELEASE," and then rotate the power supply upward to a vertical position. See Figure 13.

Figure 13. Rotating the Power Supply (Desktop Chassis)
inside11.gif (29495 bytes)
1 Power supply
2 Securing tab
3 Release latch

Rotating the Power Supply Away From the System Board (Mini Tower Chassis)

To access some components on the system board, you may have to rotate the system power supply out of the way. To rotate the power supply, perform the following steps:

  1. Remove the computer cover as instructed in "Removing the Computer Cover (Mini Tower Chassis)."

  2. Disconnect the AC power cable from the AC power receptacle on the back of the power supply (see Figure 12).

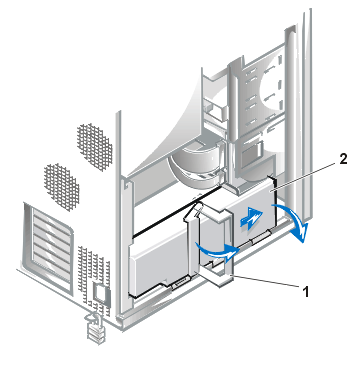
  3. Free the power supply by rotating the power supply release handle outward, and then slide the power supply toward the front of the system.
NOTE: Ensure that you slide the power supply all the way toward the front of the system before proceeding to the next step.
  1. Rotate the power supply downward. See Figure 14.
NOTE: It is helpful to lay the system on its right side so that you can rotate the power supply completely out of the system.

Figure 14. Rotating the Power Supply (Mini Tower Chassis)
inside12.gif (28431 bytes)
1 Power supply release handle
2 Power supply


To return the power supply to its original position, perform the following steps.

  1. Rotate the power supply to its original position and hold it there (see Figure 14).

  2. Rotate the power supply release handle towards the back of the system until it is closed.

    Make sure that the handle latches onto the power supply properly and the power supply slides slightly to the back of the system and locks in place.

  3. Replace the cover.

  4. Reconnect the AC power cable to the AC power receptacle on the back of the power supply.

Back to Contents Page